Home Depot Home Made Enclosures

Mantidforum

Help Support Mantidforum:

This site may earn a commission from merchant affiliate links, including eBay, Amazon, and others.
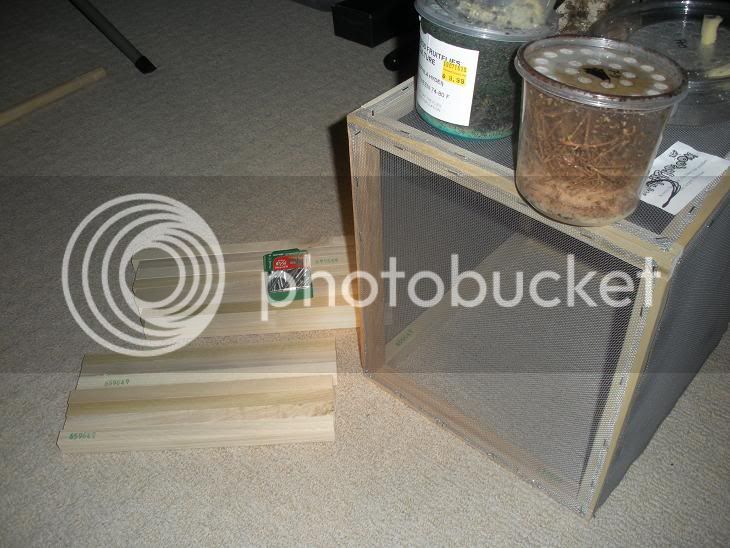
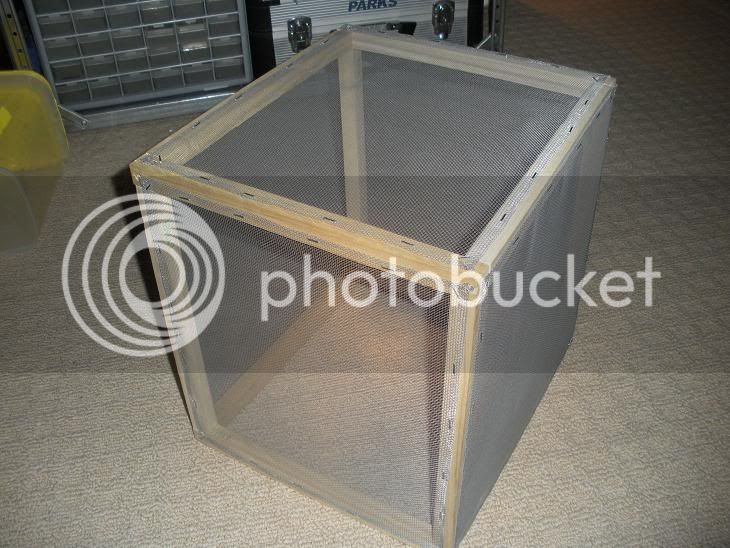
Unfortunately added features up the cost but it sounds like you guys think my design is right all around by using the aluminum screen for a bigger mantis that requires more heat!

I wonder if I could pump these things out in my apartment. haha sure to anger the neighbors before I leave this place.

 
Yep, this is nicely made, relatively inexpensive and healthy for your mantids. Even though adding a door adds to the expense, I think that you will be glad you did, especially if you are feeding your gongy (though it will comfortably take three or four) flies.. It's sturdiness should make it excellent for reptiles, especially if you're feeding crix, as Hibiscusmile says, but just, for mantids being ded on flying insects and roaches, I wonder if it is any cheaper than a 12" cube. Still, congratulations on a nice piece of work!

 
The Gongys do well in the net cubes! Great inventions. Pack up small and light weight.

Still couldn't help being a tinkerer and all what might be done at the depot.

The wooden sticks were like $0.69 each I think and the screws were overpriced so brought me to about $12 more today for 15 pieces.

I don't look at it as cost effective really. Just wasting time, but it is comparative not counting time spent.

I do have some more tinkering to do on this project soon and have the supplies, yet I scored an interview for Wed and need to prepare. Will have to hold out a short while longer. :p

You'll notice I picked all the lighter colored sticks for the softer grain this time. Helps get the staples in all the way.

For now the first one makes a great ottoman/fly caddy! :lol:

cages008.jpg


Well I guess this will be a cage for a gongy. I can put a light right on top.

Since they are mostly on top and so are the fly food, I can leave the bottom with no screen and just set it over a towel with some sphagnum.

Might be nice with a few built in perching sticks maybe. Better too little than to overdue it though.

Nice cheap cage if you have the patience to make it. I have enough screen left over for another one. So including the dowels, 2" screws, about $5 in screen and some staples I'm probably at about $12 in supplies, since I had the tools.

I'd suggest finding the square dowels that are a bit soft so the staples make it into them good. Press your fingernail into the different dowels and choose the softer ones, the ones that mark up easier. The harder dowels you may have to finish tapping in some staples with a hammer.

minicage.jpg
how do u get in??????? lol am i missing a post?

 
You only get in if I teleport you in. ;)

Joking.. there is no doors yet. One side is open still. (bottom side in picture)

I figured I would make a few more then get to the doors all at once.

Fairly soon I will have a bunch of adult mantis to put in there. Shields and Limbatas and Chinese and Gongy's etc etc so I need to make a couple before my nymphs grow up. I think they will look cool if I stack a few of them.

I decided I will do a nice door for them but have yet to get there.

 
Last edited by a moderator:
I like your enclousure.

At the school here we're mostly using whatever I can lay my hands on.

However, as it is an entomology department the actual experiments get some nice digs.

A common design is like yours, but there is a piece of wood (like molding) over each edge of screen. Making each wall sort of like an old fashion wooden frame window screen.

The 6th wall as a "door":

on the four edges of the other panels meeting the 6th wall a bolt sticks out from the center. There are holes meeting these on the 6th panel and wing nuts to tighten it down. sometimes the 6th panel is plexiglass instead of screen. I have no idea why, but I bet it encourages arthropods to cling to the screens and not the door, which simplifies getting in.

It is not the most convenient thing to take a whole wall off to feed, etc. But it is simpler than anything else I can think of.

Some other units use hinges and latches on one wall, but you get the issue of bug legs caught in the gap, and difficulty of control of who's hanging out near the bug end.

You could probably work some kind of screen/zipper opening as part of one panel. But the difficulty and cost might be excessive.

One last method I see on our chambers; one whole wall is opaque cloth (always white) that tapers out to a funnel in the middle, which is quite long. It would look sort of ghetto on a display, but for access to the chamber you just untie the "sock". Bugs are more inclined to be on the screen walls, and easier to remove from the cloth, and not as likely/able to escape while you are working. Just today I removed 170 ish grasshoppers from two such chambers using this method and it is fairly easy to work with. Though, I have no idea how the funnel/sock/square is made.

 
Nice enclosure, I'm waiting for my stuff to arrive to make some that are almost identical (differences being size: 8" x 8", baseboard at the bottom, and a door).

I currently have something similar, which is a "dual" version of this, housing 2 mantids, but I didn't make it myself and I have more adults due soon! :lol:

 
I made a couple of these today. I have zero woodwork experience, but they turned out ok, usable at least. :lol:

I have the materials to make four more, so I'm gonna knock em up tomorrow.

IMG_1806.JPG

IMG_1809.JPG

 
Haha, yeah, just a smaller frame and a hinge, then I used an off-cut for a handle. :lol:

The only problem is that the mesh I used is quite reflective in bright light so I am going to get some (non-toxic) matt grey spraypaint tomorrow for just the front netting (it doesn't show in the photos). I followed Ghostie's guide, except I had to attempt countersinking with the screw bit as I didn't have a large enough drill bit, it seemed to work. Mine are smaller too, they measure 17cm x 20cm.

My first attempt failed, I used nails instead of screws, which worked great.. until I started using the staple gun! :2guns:

Also, for anyone in the UK, I got the dowels (15mm) and mesh (mod mesh.. cheaper) from homecrafts.co.uk .. use EV25 promo code for 25% off! ^_^

I'm currently undergoing rapid mantis expansion! new shelving units arrived today, heating equipment for the winter arrives tomorrow, and ooths soon to hatch, so I need to make as many of these as possible!

 
Last edited by a moderator:
Oh awesome it looks like your cage is coming out great. Reminds me of a smaller version of the one I made my father build for me. Only difference is we attached the screen to the inside of the wood of the cage versus the outside.

 
So does the wood warp at all when you mist? And if the bottom is mesh too, how does moisture, dirt, and stuff not come out all over?. I don't mean to pick at your design, in fact thanks for the idea the encloser I have now is cheap plastic stuff and not that big but it cost like 17 bucks at petsfart luckly someone I know just got a job there and he can get me discounts soon.

 
Last edited by a moderator:
I cut a round hole in my top screen and ploped a PVC fitting in it (don't know what they're called - has a lip to hold it in place). Then just plugged it with a foam stopper. I put the flies in the freezer for the 3-minutes-trick and just funnel the wriggling fly-sicles into the cage. Savvy mantids know what I'm up to, and sort of "beg" at the spout (I used the same funnel for Fruit Flies, and they remember it).

 
"I cut a round hole in my top screen and ploped a PVC fitting in it "

Whoa, I don't know if that idea is original to you, but it's bloody brilliant.

 
Thanks. Not sure how anyone can keep track of where they heard or saw what.

Here're are pics - the black one is from Home Depot or OSH. The Red one (which works better) was leftover from some old Inflatable bunkers I had. I used hot glue to keep them in place and the screen from fraying, but I'm sure washers or some other tweak would have been better. With the red ones, the foam sticks all the way through, and there's almost always someone hanging from it. They prefer it (by far) to the screen.

Stopper 1.jpg

Stopper 2.jpg


Latest posts

Top